إعلانات

Software Request

Contact us

Softwares

Games

Showing posts with label Wordpress. Show all posts

Thursday, 14 February 2013

How to Add 3D Social Icons With Rotate Spin Effect To Wordpress And Blogger

This week we gave away a freebie set of 3D Social Icons with names, the social icons set was very popular with almost 500 downloads in 3 days ! At the time of writing I am using these Icons here on How To All Tools.I have added a few effects to the icons.The main effect and I have received a lot of comments and Emails on this is Css rotate.With the Css rotate when you place your cursor over each icon they spin 360 degrees, they then spin back 360 when the cursor is removed (Cool eh).I also have a slight opacity hover effect on the icons.So in this post I will show you how to add the icons to your blog, linked to your social profiles and feeds.


Live Demo

Here are the icons is full working order, see what happens when you place your cursor over them ; don't be afraid to click them and follow us.


Icon Icon Icon Icon Follow Me on Pinterest

Howtoalltools.blogspot.com


Add The Social Icons With Css Effects To Your Blog


OK so I have two tutorials, one for Blogger and one for Wordprtess.

Wordpress Tutorial


1) In Your Wordpress Dashboard Click 'Apperance' > 'Widgets' > Add A text Widget to your sidebar and paste the below code.

Widget Code


<style> #social a:hover {background-color: transparent;opacity:0.7;} #social img { -moz-transition: all 0.8s ease-in-out; -webkit-transition: all 0.8s ease-in-out; -o-transition: all 0.8s ease-in-out; -ms-transition: all 0.8s ease-in-out; transition: all 0.8s ease-in-out; } #social img:hover { -moz-transform: rotate(360deg); -webkit-transform: rotate(360deg); -o-transform: rotate(360deg); -ms-transform: rotate(360deg); transform: rotate(360deg); } </style> <center><div id="social"> <!--Start Rss Icon--> <a title="Grab Our Rss Feed" href="YOUR-FEED-URL-HERE" target="_blank"><img border="0" src="https://blogger.googleusercontent.com/img/b/R29vZ2xl/AVvXsEgp80vW4FA6aiz6ELm2vXHtAwPT88gvTbj23IDomxuFCmag78BRccogz13gmeEh9XeMVbC9iYyM9cVkrZlQy24pMBIEJPO05bAd3P9vVo7MP2Eb7J_HxJmnPCv2qgN0JCuSlvgKKbf_U1P4/s1600/RSS-48x48.png" style="margin-right:1px;" alt="Icon"/></a> <!--End Rss Icon--> <!--Start Email Rss Icon--> <a rel="nofollow" title="Get Free Updates Via Email" href="YOUR-EMAIL-RSS-URL-HERE" target="_blank"><img border="0" src="https://blogger.googleusercontent.com/img/b/R29vZ2xl/AVvXsEg2chRsY2eIcI2LXigCsDgDS9SYhkSDWGehFK2RnVoPtONOnkiowol8TGRCXLtlpnmzL7z6Kda4E4vvoNK9DtnJnVGbuZ7Y2STOmQ_xOcnrAfXhJYKgimypeVl7LWS7v4YP5IwAlv-AnXtK/s1600/RSS-EMAIL-48x48.png" style="margin-right:1px;" alt="Icon"/></a> <!--End Email Rss Icon--> <!--Start Facebook Icon--> <a rel="nofollow" title="Like Our Facebook Page" href="YOUR-FACEBOOK-PAGE-URL-HERE" target="_blank"><img border="0" src="https://blogger.googleusercontent.com/img/b/R29vZ2xl/AVvXsEhTVPfDV_QPSpctdbbcJMLinoAMcgBbbwL5o5b2SNoD5m2l6RiuxKvvMrUTyWW7dI6WCkJj2IjM7Sgn2xxXfSsUUbPNnWUPZ5_PM7H0BtuV1wNcPbWLbQBHhR7dQUt8TwXKVOd7Z8t3VMyK/s1600/FACEBOOK-48x48.png" style="margin-right:1px;" alt="Icon"/></a> <!--End Facebook Icon--> <!--Start Twitter Icon--> <a rel="nofollow" title="Follow Our Updates On Twitter" href="YOUR-TWITTER-URL-HERE" target="_blank"><img border="0" src="https://blogger.googleusercontent.com/img/b/R29vZ2xl/AVvXsEgefw8O15loOgeRx3s5sBOLya3ow7dCmRj-aWqCQ633apRAMpoe0O40TN6zdLya1yX2JbqIGQrNzx_tXuI-2x24uUC9YN6_MCK1aNC3TwLVoqhcGlRgCG9Ax-UvBMSsbWsQRac04JhMEDEw/s1600/TWITTER-48x48.png" style="margin-right:1px;" alt="Icon"/></a> <!--End Twitter Icon--> <!--Start Google+ Icon--> <a title="Follow Us On Google+" rel="nofollow" href="YOUR-GOOGLE-PLUS-URL-HERE" target="_blank"><img style="margin-right:1px;" src="https://blogger.googleusercontent.com/img/b/R29vZ2xl/AVvXsEjLh27oseSFP1Wv8T5oKGs70vYFX3ZCyP0bXgRjyMfrFGzBEoO0Ltd5nT3-iepy9yvAsT2OZm7MecMnNLVz3q4mJH_51orbpyR8RzgjBr25OpBmFbB0j39qJU5SURyMspKkgumCuunC9p46/s1600/GOOGLE-PLUS-48x48.png"/></a> <!--End Google+ Icon--> <!--Start Pinterest Icon--> <a title="Follow Our Pins" rel="nofollow" href="YOUR-PINTEREST-URL-HERE" target="_blank"><img style="margin-right:1px;" src="https://blogger.googleusercontent.com/img/b/R29vZ2xl/AVvXsEignM8OJYteD5Ai_1z2u58Bz05h5k5Un9vbVAxHueUQsczb2sdSjdXOMuGKeInvR-86tfQ9jdQ5XiSFgO76-g92qE0eCvZ-Kv8mZnM6WvBxbmDRkArIlGkz32lv9shG_aV2uBcr4b0fOW7X/s1600/PINTEREST-48x48.png" alt="Follow Me on Pinterest" /></a> <!--End Pinterest Icon--> </div><br/> <!--Start Feed Count Button--> <a href="YOUR-FEEDBURNER-URL-HERE" target="_blank"><img alt="Howtoalltools.blogspot.com" src="http://feeds.feedburner.com/~fc/spiceupyourblog?bg=ff9933&fg=000000&anim=1" style="border:0" /></a><!--End Feed Count Button--> </center>

Important - Replace the yellow sections with your social profiles and feed URLs.

Note - If your familiar with Wordpress you can off course add the Css to your theme stylesheet.

Remove some of the icons - I have the code for each icon between tags like this <!--Start Rss Icon-->Code here<!--End Rss Icon-->>, to remove an icon remove the code between the tags.So for pinterest you will remove the code between the Start Pinterest and End Pinterest tags etc...

Blogger Tutorial

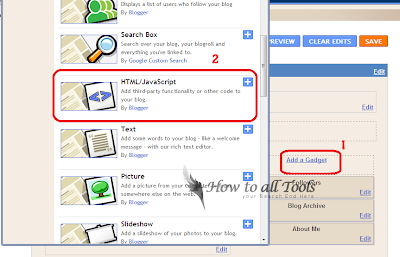
1) In the new Blogger dashboard click the drop down menu for your blog > Choose 'Layout' > Click 'Add A Gadget' > Choose 'Html Javascript' > Paste Below Code.
 Widget Code


<style> #social a:hover {background-color: transparent;opacity:0.7;} #social img { -moz-transition: all 0.8s ease-in-out; -webkit-transition: all 0.8s ease-in-out; -o-transition: all 0.8s ease-in-out; -ms-transition: all 0.8s ease-in-out; transition: all 0.8s ease-in-out; } #social img:hover { -moz-transform: rotate(360deg); -webkit-transform: rotate(360deg); -o-transform: rotate(360deg); -ms-transform: rotate(360deg); transform: rotate(360deg); } </style> <center><div id="social"> <!--Start Rss Icon--> <a title="Grab Our Rss Feed" href="YOUR-FEED-URL-HERE" target="_blank"><img border="0" src="https://blogger.googleusercontent.com/img/b/R29vZ2xl/AVvXsEgp80vW4FA6aiz6ELm2vXHtAwPT88gvTbj23IDomxuFCmag78BRccogz13gmeEh9XeMVbC9iYyM9cVkrZlQy24pMBIEJPO05bAd3P9vVo7MP2Eb7J_HxJmnPCv2qgN0JCuSlvgKKbf_U1P4/s1600/RSS-48x48.png" style="margin-right:1px;" alt="Icon"/></a> <!--End Rss Icon--> <!--Start Email Rss Icon--> <a rel="nofollow" title="Get Free Updates Via Email" href="YOUR-EMAIL-RSS-URL-HERE" target="_blank"><img border="0" src="https://blogger.googleusercontent.com/img/b/R29vZ2xl/AVvXsEg2chRsY2eIcI2LXigCsDgDS9SYhkSDWGehFK2RnVoPtONOnkiowol8TGRCXLtlpnmzL7z6Kda4E4vvoNK9DtnJnVGbuZ7Y2STOmQ_xOcnrAfXhJYKgimypeVl7LWS7v4YP5IwAlv-AnXtK/s1600/RSS-EMAIL-48x48.png" style="margin-right:1px;" alt="Icon"/></a> <!--End Email Rss Icon--> <!--Start Facebook Icon--> <a rel="nofollow" title="Like Our Facebook Page" href="YOUR-FACEBOOK-PAGE-URL-HERE" target="_blank"><img border="0" src="https://blogger.googleusercontent.com/img/b/R29vZ2xl/AVvXsEhTVPfDV_QPSpctdbbcJMLinoAMcgBbbwL5o5b2SNoD5m2l6RiuxKvvMrUTyWW7dI6WCkJj2IjM7Sgn2xxXfSsUUbPNnWUPZ5_PM7H0BtuV1wNcPbWLbQBHhR7dQUt8TwXKVOd7Z8t3VMyK/s1600/FACEBOOK-48x48.png" style="margin-right:1px;" alt="Icon"/></a> <!--End Facebook Icon--> <!--Start Twitter Icon--> <a rel="nofollow" title="Follow Our Updates On Twitter" href="YOUR-TWITTER-URL-HERE" target="_blank"><img border="0" src="https://blogger.googleusercontent.com/img/b/R29vZ2xl/AVvXsEgefw8O15loOgeRx3s5sBOLya3ow7dCmRj-aWqCQ633apRAMpoe0O40TN6zdLya1yX2JbqIGQrNzx_tXuI-2x24uUC9YN6_MCK1aNC3TwLVoqhcGlRgCG9Ax-UvBMSsbWsQRac04JhMEDEw/s1600/TWITTER-48x48.png" style="margin-right:1px;" alt="Icon"/></a> <!--End Twitter Icon--> <!--Start Google+ Icon--> <a title="Follow Us On Google+" rel="nofollow" href="YOUR-GOOGLE-PLUS-URL-HERE" target="_blank"><img style="margin-right:1px;" src="https://blogger.googleusercontent.com/img/b/R29vZ2xl/AVvXsEjLh27oseSFP1Wv8T5oKGs70vYFX3ZCyP0bXgRjyMfrFGzBEoO0Ltd5nT3-iepy9yvAsT2OZm7MecMnNLVz3q4mJH_51orbpyR8RzgjBr25OpBmFbB0j39qJU5SURyMspKkgumCuunC9p46/s1600/GOOGLE-PLUS-48x48.png"/></a> <!--End Google+ Icon--> <!--Start Pinterest Icon--> <a title="Follow Our Pins" rel="nofollow" href="YOUR-PINTEREST-URL-HERE" target="_blank"><img style="margin-right:1px;" src="https://blogger.googleusercontent.com/img/b/R29vZ2xl/AVvXsEignM8OJYteD5Ai_1z2u58Bz05h5k5Un9vbVAxHueUQsczb2sdSjdXOMuGKeInvR-86tfQ9jdQ5XiSFgO76-g92qE0eCvZ-Kv8mZnM6WvBxbmDRkArIlGkz32lv9shG_aV2uBcr4b0fOW7X/s1600/PINTEREST-48x48.png" alt="Follow Me on Pinterest" /></a> <!--End Pinterest Icon--> </div><br/> <!--Start Feed Count Button--> <a href="YOUR-FEEDBURNER-URL-HERE" target="_blank"><img alt="Howtoalltools.blogspot.com" src="http://feeds.feedburner.com/~fc/spiceupyourblog?bg=ff9933&fg=000000&anim=1" style="border:0" /></a><!--End Feed Count Button--> </center>

Important - Replace the yellow sections with your social profiles and feed URLs.

Remove some of the icons - I have the code for each icon between tags like this <!--Start Rss Icon-->Code here<!--End Rss Icon-->>, to remove an icon remove the code between the tags.So for pinterest you will remove the code between the Start Pinterest and End Pinterest tags etc...

That's it you have a very cool subscribe section on your blog.

Drop Your Comments And Questions Below.

Saturday, 28 January 2012

How to Add Back To Top Button To Blogger Blog


Hi friend . Today I will tell you How to Add Back To Top Button To Blogger. Friend if u have lot of posts on your Blog and you want to make easy your blog for your vistors. Back to Top button make it easy for your vistors. They can explore your Blog faster and better. This is a good and fastest way and trick to go bottom to top. To add this in your Blog follow Steps Blow.

How to Add Back To Top Button To Blogger Blog :

  • To Add this follow these steps.
  • Login to your Blogger Account.
  • Goto Design>>Page Elements.
  • Now click on Add a Gadet.
  • Now select  HTML/Javascript
  • Now copy this folwoing Red code in Content the box.

<!--Back to top Start from here-->
<a alt="Back to Top" style="display:scroll;position:fixed;bottom:25px;right:5px;" href="#" title="Back to Top"><img onmouseover="this.src='https://blogger.googleusercontent.com/img/b/R29vZ2xl/AVvXsEjmRFXuwWWcvQE0b9xuDCZAgWs2hV8iJAWh-lNqxV1eHNYlzXp2DlLokX2_9vZYnZVsz56o_pe3KHayJW32mc-Y8NUhoP-G7mpEs4HJZ62tCd6XVcwMs53fTOH2ffZHOpC53v1uo3G8NZVF/s1600/BTT+large.gif'" src="https://blogger.googleusercontent.com/img/b/R29vZ2xl/AVvXsEh05yvT4kVbyU_HAJUGzJecjtp2OsM9XVyA69Qm0yWqKKCBTHRsLCA_xdGEnS4VgDRTPz7KUkIkAD6-nSMKJp4D1B4oHdG8p2U0KldI2TyM_-HWoC8B8MxOtSkVWNBbboNVRc11F_GqytvG/s1600/BTT+small.gif" onmouseout="this.src='https://blogger.googleusercontent.com/img/b/R29vZ2xl/AVvXsEh05yvT4kVbyU_HAJUGzJecjtp2OsM9XVyA69Qm0yWqKKCBTHRsLCA_xdGEnS4VgDRTPz7KUkIkAD6-nSMKJp4D1B4oHdG8p2U0KldI2TyM_-HWoC8B8MxOtSkVWNBbboNVRc11F_GqytvG/s1600/BTT+small.gif'" /></a>
<!--BACK to TOP-IMAGE-STOPS-->
<!--Back to top End at here-->
  • Just save this.
  • You done this. If u like this Plz comment and subscribe us....!

How to Add Floating ( Sliding ) Share Buttons To Blogger Sidebar


Hi friend you are her today to learn How to Add Floating ( Sliding ) Share Buttons To Blogger Sidebar. you must have seen in many wordpress or other blogs. Now i will tell you for Blogger how to add a floating share buttons widget.It will appear outsid of your post sections and as you scroll the page, this widget will also scroll with some animation effects.

How to Add Floating ( Sliding ) Share Buttons To Blogger Sidebar :

  •  To Add this follow these steps.
  • Login to your Blogger Account.
  • Goto Design>>Page Elements.
  • Now click on Add a Gadet.
  • Now select  HTML/Javascript
  • Now copy this folwoing Red code in Content the box.


<!-- floating share bar Start blogger4ever.com-->
<style type="text/css">
#pageshare {
float:left;
margin-left:-80px;
background: #fafafa;
position:fixed;
bottom:20%;
border:1px solid #e5e5e5;-webkit-border-radius:3px;-moz-border-radius:3px;border-radius:3px;}
#pageshare:hover {
background-color:#ffffff;-webkit-box-shadow:0px 2px 2px rgba(0,0,0,.1);-moz-box-shadow:0px 2px 2px rgba(0,0,0,.1);box-shadow:0px 2px 2px rgba(0,0,0,.1);}
#pageshare .sbutton {
float:left;clear:both;margin:5px 5px 0 5px;}</style>

<div id='pageshare' title="Get this Widget from    How To All Tools.com">
<div class='sbutton' id='tweet'>
<script src="http://platform.twitter.com/widgets.js" type="text/javascript"></script>
<a href="http://twitter.com/share" class="twitter-share-button" data-count="vertical" data-via="YOUR TWITTER USERNAME">Tweet</a> </div>
<div class='sbutton' id='su'>
<script src="http://www.stumbleupon.com/hostedbadge.php?s=5"></script>
</div>
<div class='sbutton' id='gplusone'>
<script type="text/javascript" src="https://apis.google.com/js/plusone.js"></script>
<g:plusone size="tall"></g:plusone> </div>
<div class='sbutton' id='fbshare'>
<div id="fb-root"></div>
<script>(function(d, s, id) {
var js, fjs = d.getElementsByTagName(s)[0];
if (d.getElementById(id)) return;
js = d.createElement(s); js.id = id;
js.src = "//connect.facebook.net/en_US/all.js#xfbml=1";
fjs.parentNode.insertBefore(js, fjs);
}(document, 'script', 'facebook-jssdk'));</script>
<div class="fb-like" data-send="true" data-layout="box_count" data-width="50" data-show-faces="false"></div></div>
<div style="clear: both;font-size: 10px;text-align:center;"><a href="http://howtoalltools.blogspot.com/2012/01/how-to-add-floating-sliding-share.html">Get Widget</a></div><!-- Do not remove this link --> </div>
<!-- floating share bar End --> 
  • Save it.
  • Drag it under Blog Post section.
  • You done it, Alway comment and subscribe us.

Monday, 23 January 2012

How To Submit Blog Sitemap to Bing and Yahoo with Bing Webmaster Tools


Hi guys. you are here for how to submit your site to yahoo or Bing Webmaster Tools. Therefore You can  Drive more visitors to your site using Bing or yahoo. Vistors form search engines is really good way to increase ur traffic of  your website or Blog. Traffic form search engines is not costly is free of cost.
How To Submit Blog Sitemap to Bing and Yahoo with Bing Webmaster Tools :

  1. First login to Bing Webmaster tools. Click Here
  2. After this Add your site From Bing Dashboard


Verify your site After that select 2: Option for Verify

Copy Meta tag wich Bing gnerates for your site and copey this right after <head> Tag and save template you done this. Site will be indexed with in 3 or Days. Always comment and subscribe us....

Friday, 20 January 2012

How To Submit Blog Sitemap to Google with Google Webmaster Tools

Dear Users you know that Every Blog Owner wants to get traffic Mostly from Google. This is a Goal of every  Blog owner. So how do you get more traffic from google? There are many ways like Quality Content, Good punctuation, Good grammar, onsite and offsite optimization. Main and Important thing to drive traffic to your blog is Submission of site map in Google . When first Time i have added my blog sitemap to Webmaster, the sitemap added to webmaster but not all of my blog has index to webmaster. I have written almost 40 posts that time and it was showing 26 Urls submitted. I was worried about that and I searched on Google about my problem and then I found the answer. Today I will share with you how to add all blog sitemap to webmaster tools.


How to Add your blog to Google Webmaster Tool :

Goto Google webmaster tools.  If you haven't already added your blog to webmaster tool. Then click on Add a site Button.

How to Add sitemap to Webmaster Tool :

After adding your site to webmaster tool, you need to see at the right sidebar on Google webmaster tool there will be some links. Go to Site Site verification and verify ur site. and after verify ur site Then click Here After that click on your Blog and On the next page
Click on Submit a sitemap.


Now, copy the URL given below and paste it to that field. This is a basic sitemap; you need to submit it first. Click on Submit sitemap.


/atom.xml?redirect=false

Then enter the second sitemap. This is to index the first 100 posts on your blog, which means post number 1 until post number 100.


/atom.xml?redirect=false&start-index=1&max-results=100


 If you have more than 100 posts on your blog, submit this link as well. This will index post number 101 until post number 200.


/atom.xml?redirect=false&start-index=101&max-results=100

 If you have more than 200 posts on your blog, submit this link as well. It will index post201 until 300.


/atom.xml?redirect=false&start-index=201&max-results=100

If you have written 1000’s of posts, you have to submit sitemap after every 100 posts.

How to Add Alexa Widget for Blogger, Wordpress or Websites


Alexa Widget is very cool, stylish and importent widget for ur blog or website. u can easily add this widget to ur website or blogger.

Click Here To Add Alexa Widgets In Ur Blog

How to Add Danasoft Widget for Blogger, Wordpress or Websites

Danasoft sign is Very funny, Cool, stylish and amazing widget wich you can add to your blog, forum posts, or your website. You can also customize the graphic with your own messages or Custom Quote. When people see the sign, they will see all sorts of spooky information about them (it works like a one-way mirror), like their IP address, operating system (Windows, Mac), web browser type, along with your customized message at the bottom, You can published right on your profile, blog, or website. It also have a new city graphic that tells the person where they live, which is especially freaky.


How to Add Danasoft Widget :

First Go to Here

Selecte ur Code wich one you want to display on  ur Blog or Website. And after login to ur blogger account. Goto Dashboard>>Design>>Add a Gadget>>HTML/Javascript .


how+to+add+Html+java+script

Then past ur code and Save it. U done this. u have added Danasoft Widget  to your Blogger.

How to Add MapLoco Widget for Blogger, Wordpress or Websites

This Wiget is very cool and stylish. After adding this widget to ur Blog or website u can see where from come vistors on your site on World Map.

How to Add MapLoco Widget :

First Go to Here
Selecte ur Code wich one you want to display on  ur Blog or Website. And after login to ur blogger account. Goto Dashboard>>Design>>Add a Gadget>>HTML/Javascript .


how+to+add+Html+java+script

Then past ur code and Save it. U done this. u have added MapLoco Widget  to your Blogger.

How to Add Add Page Rank Button or Icon to your Blogger, Wordpress or Website - FREE!

After adding this cool stylish and simple Google Pagerank widget to your Blogger, Wordpress or Website you can view ur pagerank pages of ur blog or site. This is Free and nice tool. This will show in cool and small icon and show ur Google Pagerank.

How to Add Add Page Rank Button or Icon
First Go to Here


Selecte ur Code wich one you want to display on  ur Blog or Website. And after login to ur blogger account. Goto Dashboard>>Design>>Add a Gadget>>HTML/Javascript .


how+to+add+Html+java+script

Then past ur code and Save it. U done this. u have added Page Rank widget to your Blogger.

How to Add Vistors Counters For Blogger, Wordpress or Websites

After add Visitor counter to  blogger will give  you a complete view and information about your visitors, where frome they come and their county name, Flag, no's of Vistors, page impression, Page views, No of  unique visitors etc. Counters will also gave you total Structure in graph and And count Hits for your blogger page. Blogger aslo have a default visitor tracker Google ( Google Analytics )  but third party visitor counter has more advanced Tracker statistics services. they r very easy and cool in view.


In these days lot of sites they offers totally free visitor counter. You can add easily Vistor counter by using the following sites. Among all sites most popular sites are Google Analytics, StatCounter, Histats and SiteMeter. This sites are so popular for their feature and sophisticated services. You can try Google or SimilarSites to find this kind of sites. Some More Sites: EasyCounterFlagCounter WhatCounter Website-Hit-Counters AmazingCounters ActiveMeter Addfreestats HitsLog SimpleHitCounter Free-counters.co.uk

Subscribe and comment us...

How to Decorate ur Text For Blogger

Dear users you can Change ur Text or Links Animated Text decoration Effect. This is very cool and stylish effect that will attrect vistors to ur Blog. u can see its preview blow.


Preview of Animated Decoreted Text effect :

How To All Tools - Top tutriols, Tool & Tips


Why Google Adsense Application Rejected - Unacceptable Site Content


Facebook Comments Box For Blogger In Very Easiest and Simple Steps ( Full Tutriol )


How to add an Animated Twitter Bird to Blogger and WordPress


How to Add Animated Decorated Text Effect :


.::Code For Blogger::.

<a target="_blank" href="Put Ur Address Here
"><span style="font-size: 8pt; text-decoration:blink">Put Ur Text Here
</span></a>

Note :- If u want to add this text decoration code In HTML/JavaScript
U have to Add this code showing blow.

</li><a target="_blank" href="Put Ur Address Here
"><span style="font-size: 8pt; text-decoration:blink">Put Ur Text Here
</span></a></li>


Be sure u Change "Put Ur Address" or "Put Ur Text"

Possible Values

  Value-------------Description

►none -------------  Defines a normal text. This is default
►underline ----------   Defines a line below the text
►overline ------------- Defines a line above the text
►line-through --------- Defines a line through the text
►blink ---------------- Defines a blinking text
►inherit -------------- Specifies that the value of the text-decoration property should be inherited from the parent element


Browser Support

►The text-decoration property is supported in all major browsers.
►No versions of Internet Explorer (including IE8) support the property value "inherit".
►The "blink" value is not supported in IE, Chrome, or Safari.

Its done. Comments and subscribe us.

How to Add Flag Counter widget For Blogger , wordpress or website


Flag counter Widget For  Blogger, Wordpress or Websites :

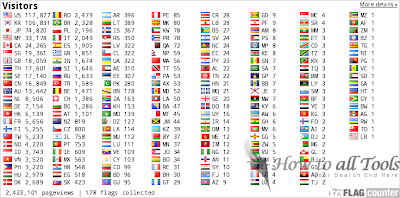
As u see above in image. Many people come on ur site from internet many time from different countries. This cool widget show thir no's and their country flag also. you can aslo count ur Pages vies and No of vistors from this widget.
So this is why we can see that how much vistor form wich county. this is very simpl to add in ur blog or site.

Click Here To Add Flag Counter Widget In Ur Blogger, Wordpress or Website

And after that chose ur template and get code of flag counter wiget.First login to ur blogger account. Goto Dashboard>>Design>>Add a Gadget>>HTML/Javascript .

Then past ur code and Save it. U done this. u have added Flag counter widget to ur blog.

Saturday, 7 January 2012

How to add an Animated Twitter Bird to Blogger and WordPress

I think u r on this post because u see Flying Twitter Bird on this blog and you might have noticed that bird is following you where u navigate on the blog. This make your blog looks Awesome and attrective and also help getting some tweets and followers on twitter. See the image for an idea of the bird.


How to Add the Animated Twitter bird to Blogger/Blogspot
* First Login and go to Dashboard >> Design >> Edit HTML.
* Search for  

</body>

* Copy the code below and paste it just below </body>


<script type="text/javascript" src="http://bloggerblogwidgets.googlecode.com/files/way2blogging.org-tripleflap.js"> </script> <script type="text/javascript"> var twitterAccount = "howtoalltools"; var tweetThisText = " <data:blog.pageTitle/> : <data:blog.url/> "; tripleflapInit(); </script>


Be sure to change ‘howtoalltools‘ to your twitter username.

* Save Template. and it's Done...!