إعلانات

Software Request

Contact us

Softwares

Games

Showing posts with label Tips. Show all posts

Friday, 6 April 2012

TecDoc CATALOG 02.2012 Multilanguage 4 DVD

The TecDoc CATALOGUE is a flexible information systems, which allows you several personal settings to ease your daily work. TecDoc supplies the free vehicle spare parts market with current and comprehensive data for identifying and ordering parts – for both, PC as well as CV – directly from the databases of the cooperating automotive aftermarket manufacturers in a standardised catalogue form.

TecDoc is also MULTILANGUAGE you can swicth language without shutting the programs or install additional components: Italian, French, German, Spanish, Portuguese, Greek, Danish, Chinese etc...

TecDoc CATALOGUE is an electronic parts catalogues from standardised data records

Original data of parts manufacturers on DVD

* more than 2,425,000 articles
* over 1,133,000 illustrations
* more than 40,000 PC types
* 30,000 real existing CV types
* with technical additional information
* updated every 3 months
* multilanguage: 23 languages

TecDoc The Information System is the information source for the vehicle repair market with the original data of the parts manufacturers. Founded in 1994 by companies of the automotive aftermarket industry and the German Association for Spare parts (GVA), TecDoc Informations System GmbH has established itself as the leading supplier of electronic spare parts information on the European market.

Data search can be filtered by the following criteria (from the TecDoc manual):

1. General:
Engine Code: the engine code
Engine Type: then engine type
TecDoc supplies the free vehicle spare parts market with current and comprehensive data for identifying and ordering parts – for both, PC as well as CV – directly from the databases of the cooperating automotive aftermarket manufacturers in a standardised catalogue form.

2. by Model Year (from/to): the engine was/is constructed during this period
Engine Number: the engine number as defined by TecDoc

3. by Technical data:
Output in kW: engine output in kW
Output in HP: engine output in HP
Capacity (technical): engine capacity in technical terms
Cylinder: number of cylinders
Valves: number of valves
Torque in Nm: the maximum torque
Compression: the engine compression
Bore: engine cylinder bore
Stroke: piston stroke of the engine
Main Bearings: the number of crankshaft main bearings
Engine Block Design: the engine block design, i.e. straight or V
Fuel Type: the required fuel type
Charging: the type of charging, i.e. turbo- or supercharger
Cylinder Head Design: the cylinder head design, i.e. OHC or OHV
Engine Control: the type of engine control, i.e. timing belt or chain
Valve Control: the type of valve control
Cooling Type: the type of engine cooling, i.e. water or air

TecDoc CATALOG 02.2012 Multilanguage 4 DVD


download

25.8 GB
TecDoc CATALOG 02.2012 Multilanguage

Tuesday, 6 March 2012

How to install Windows 8 (With) From a USB drive (Flash Drive) Easiest way

For many enthusiasts there's nothing quite like getting your hands on a shiny new release of Microsoft's Windows operating system. And that's precisely why the web is buzzing with all things Microsoft, as the software giant has made available a Consumer Preview of its next flagship OS, Windows 8.

The Consumer Preview is strictly a pre-release version of Windows 8 and is free to try, but Microsoft is keen to stress that the software is "not the finished product," and states that "you should back up your data and you shouldn't test Windows 8 Consumer Preview on your primary home or business PC."
Food for thought, but if you are intent on trying Windows 8 and you have no intention of donating a blank DVD, here's a brief guide on how to easily install Windows 8 from a USB pen drive.
Here's what you need: a USB pen drive (4GB or greater in size), the Windows 8 Consumer Preview disk image file (64-bit download here, 32-bit download here), Microsoft's Windows 7 USB tool (download here) and a working PC.
Once you have all those, follow these steps:

1. Install and run Microsoft's Windows 7 USB tool. In the subsequent window (pictured below), browse to the 32-bit or 64-bit Windows 8 disk image file you've already downloaded and hit next.


2. With your USB stick plugged in (remember, it'll need to be at least 4GB in size for a 64-bit install), choose USB device as your media type.


3. Select the correct removable device from the drop-down menu, then click begin copying.


4. Sit back, relax, and make a cuppa while the USB tool formats your pen drive, makes it bootable, and copies over all of the Windows 8 files.


5. Once the process is complete, the USB drive can be used to boot a PC and run the Windows 8 setup process.


That's all there is to it. You'll save yourself a blank DVD, the Windows 8 setup process should be quicker from flash-based media, and it's of course a must on netbooks or laptops without an optical drive.
Already running the Windows 8 preview? Share your thoughts and experiences in Comments....And like our Platforum on Facebook, Twitter or Youtube.

Click Here to Download Windows 8

Friday, 3 February 2012

How to Add Language Translate widget for Blogger


Hi friends you are here tody because u learn how to add language translate widget in blogger. This is very cools and stylish trick to increse your blogger vistors. If any vistor can't understand English easily he/she can change langualge as he/she want or require. This widget will aslo help to increase your bogger traffic and vistor will like to visit your blog. They love to stay and spend time on your blogger.To add Language Translate widget in your blogger follow steps blow.

How to Add Language Translate widget  for Blogger :

  • To Add this follow these steps.
  • Login to your Blogger Account.
  • Goto Design>>Page Elements.
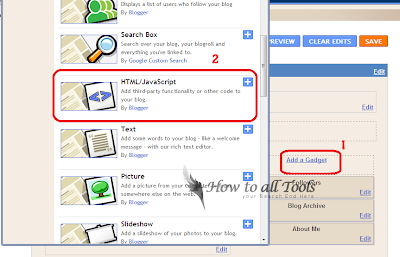
  • Now click on Add a Gadet.
  • Now select  HTML/Javascript
  • Now copy this folwoing code in Content the box.

<!--Language Translate widget Start from here-->
<style>

 .google_translate img {
        filter:alpha(opacity=100);
        -moz-opacity: 1.0;
        opacity: 1.0;
        border:0;
        }
        .google_translate:hover img {
        filter:alpha(opacity=30);
        -moz-opacity: 0.30;
        opacity: 0.30;
        border:0;
        }
        .google_translatextra:hover img {
        filter:alpha(opacity=0.30);
        -moz-opacity: 0.30;
        opacity: 0.30;
        border:0;
        }
  </style>

 <div>

 <a class="google_translate" href="#" target="_blank" rel="nofollow" title="English" onclick="window.open('http://translate.google.com/translate?u='+encodeURIComponent(location.href)+'&langpair=auto%7Cen&hl=en'); return false;"><img alt="English" border="0" align="absbottom" title="English" height="24" src="https://blogger.googleusercontent.com/img/b/R29vZ2xl/AVvXsEhrgID6MwbE2tE1pWIaqXzrQHyiWc7fQH7RorCiRvs0-xEv86TkiNnbPDU5iQYzFy8QKZUSAiJu74YXKdI9W0GAZIl458U19maoFqOXU04PXC3DiDaiRiWZR_f5UZxEwGGDjMXxwXXJkuw/s200/United+Kingdom(Great+Britain).png" style="cursor: pointer;margin-right:8px" width="24"/></a>

 <a class="google_translate" href="#" target="_blank" rel="nofollow" title="French" onclick="window.open('http://translate.google.com/translate?u='+encodeURIComponent(location.href)+'&langpair=auto%7Cfr&hl=en'); return false;"><img alt="French" border="0" align="absbottom" title="French" height="24" src="https://blogger.googleusercontent.com/img/b/R29vZ2xl/AVvXsEhGJuAUavcWvVvPj2hBafMk3WJQU6nDW2PuB91ELMzrVnc5B8Xx983f3VvJLx-DZtHoM-LDfRRI4qkn2SKB6mstjv2Bht-qELwid-hY-ssSGWEp52ASwL4Sg5IrPcxjD7Af4hgxCbHnBBA/s200/France.png" style="cursor: pointer;margin-right:8px" width="24"/></a>

 <a class="google_translate" href="#" target="_blank" rel="nofollow" title="German" onclick="window.open('http://translate.google.com/translate?u='+encodeURIComponent(location.href)+'&langpair=auto%7Cde&hl=en'); return false;"><img alt="German" border="0" align="absbottom" title="German" height="24" src="https://blogger.googleusercontent.com/img/b/R29vZ2xl/AVvXsEh7rqdg7zKELRGmpgWjCLvCJldaUeAeidTDdTVbVK4Y3pPFaus5Fu185Wfp84Rnvic6uxAb6QgzWGT1GXzTYEFUibrwCuYA21sAlyP3dRgkRxxwOT2yrgGK-CIW3JbCBJsIxNLG-In3HNk/s200/Germany.png" style="cursor: pointer;margin-right:8px" width="24"/></a>

 <a class="google_translate" href="#" target="_blank" rel="nofollow" title="Spain" onclick="window.open('http://translate.google.com/translate?u='+encodeURIComponent(location.href)+'&langpair=auto%7Ces&hl=en'); return false;"><img alt="Spain" border="0" align="absbottom" title="Spain" height="24" src="https://blogger.googleusercontent.com/img/b/R29vZ2xl/AVvXsEib32hmhvYhwVVnGCOWZ4O-cOkrEm1X8N2z3AAex6u3xC7K56WN2RdVaHq7F8vbtfkpSwack4sed14N7OpMD0xdaCjhqzWG6eFx1efNqVi3URHm0_AjAPQWhdqV2Uzpnm9kyqGjGaVWgE4/s200/Spain.png" style="cursor: pointer;margin-right:8px" width="24"/></a>

 <a class="google_translate" href="#" target="_blank" rel="nofollow" title="Italian" onclick="window.open('http://translate.google.com/translate?u='+encodeURIComponent(location.href)+'&langpair=auto%7Cit&hl=en'); return false;"><img alt="Italian" border="0" align="absbottom" title="Italian" height="24" src="https://blogger.googleusercontent.com/img/b/R29vZ2xl/AVvXsEhL4nJWdFTs7GxWbCn2wiO-BnPlxryJfgi6Id-Q_Gg201tVw3io2SPtc933_QW3ZmO81-IdNWs8TkpGrsUUbn5_IZocUIbk9t2fMbeAco2pU8fYkAA1tivlLnRd2gDq2CeobvnlBJ6XqEk/s200/Italy.png" style="cursor: pointer;margin-right:8px" width="24"/></a>

 <a class="google_translate" href="#" target="_blank" rel="nofollow" title="Dutch" onclick="window.open('http://translate.google.com/translate?u='+encodeURIComponent(location.href)+'&langpair=auto%7Cnl&hl=en'); return false;"><img alt="Dutch" border="0" align="absbottom" title="Dutch" height="24" src="https://blogger.googleusercontent.com/img/b/R29vZ2xl/AVvXsEgak9FO3IZ8arTv9r9r22X9014j5GhaxIir51SlxTia5YkTWWlwldagawaJF4VdW9E0Zl5Y79XHlCzSlHPbqH7d7puLsme3ZCyRxYH4cD_v17mU9bsEGHAaFZtGx5iYLIxal6Trb5p-Mzw/s200/Netherlands.png" style="cursor: pointer;margin-right:8px" width="24"/></a>
      <a class="google_translate" href="#" target="_blank" rel="nofollow" title="Russian" onclick="window.open('http://translate.google.com/translate?u='+encodeURIComponent(location.href)+'&langpair=auto%7Cru&hl=en'); return false;"><img alt="Russian" border="0" align="absbottom" title="Russian" height="24" src="https://blogger.googleusercontent.com/img/b/R29vZ2xl/AVvXsEiF60tGNE7iZqPouE46ubhltbPidND7AWSt1fYhduDfPRDDG2fzG3Nr41RfDr4Z-jreuCkKbq_0VYU5IA3LXb_dIoS20LhtupQCnfg4Xo6mdp8OvaJ3L5djqIJz0I6FrwK172SAk_no96w/s200/Russian+Federation.png" style="cursor: pointer;margin-right:8px" width="24"/></a>

 <a class="google_translate" href="#" target="_blank" rel="nofollow" title="Portuguese" onclick="window.open('http://translate.google.com/translate?u='+encodeURIComponent(location.href)+'&langpair=auto%7Cpt&hl=en'); return false;"><img alt="Portuguese" border="0" align="absbottom" title="Portuguese" height="24" src="https://blogger.googleusercontent.com/img/b/R29vZ2xl/AVvXsEhqwe8TQTXevSEhKMb7xMPlZNfdoIHauGLNGpfPiykH08tWR5yD5tq6MZU0pg2-ZMRhqXBhi1WZ9wuUiOk8cU-lmxN3dW4ddbWZgLNvYot0PnMSFn9buxWq5k6VqdEgo9sxkOmIInJCSu4/s200/Brazil.png" style="cursor: pointer;margin-right:8px" width="24"/></a>

 <a class="google_translate" href="#" target="_blank" rel="nofollow" title="Japanese" onclick="window.open('http://translate.google.com/translate?u='+encodeURIComponent(location.href)+'&langpair=auto%7Cja&hl=en'); return false;"><img alt="Japanese" border="0" align="absbottom" title="Japanese" height="24" src="https://blogger.googleusercontent.com/img/b/R29vZ2xl/AVvXsEgau3OK47EI9Eg6XDrMueYcdzojCvjJYpbbFBJwsTfJegHJzl5ADF0VcjCvxFDczfa0fcpgpvfcoxuVOTjYGbjo2Qyrt5jmrqxaOU4rmA089lr8h6MWFqHCbdim0dE-ShsU-sA3j2O0ffw/s200/Japan.png" style="cursor: pointer;margin-right:8px" width="24"/></a>

 <a class="google_translate" href="#" target="_blank" rel="nofollow" title="Korean" onclick="window.open('http://translate.google.com/translate?u='+encodeURIComponent(location.href)+'&langpair=auto%7Cko&hl=en'); return false;"><img alt="Korean" border="0" align="absbottom" title="Korean" height="24" src="https://blogger.googleusercontent.com/img/b/R29vZ2xl/AVvXsEg47_NpJbXcAWWiHp9YUrYr9B33F2TkF45LeRRAgFp7zUpqJP4Gf9qAvQKza6J0ySRVQ3w9wvgKZBQuCJIzBBHXQdD5EkmfcV4cjjcCw23YtdONDlw_SB7vfAziII3VOHZNwJys-h6_b-8/s200/South+Korea.png" style="cursor: pointer;margin-right:8px" width="24"/></a>

 <a class="google_translate" href="#" target="_blank" rel="nofollow" title="Arabic" onclick="window.open('http://translate.google.com/translate?u='+encodeURIComponent(location.href)+'&langpair=auto%7Car&hl=en'); return false;"><img alt="Arabic" border="0" align="absbottom" title="Arabic" height="24" src="https://blogger.googleusercontent.com/img/b/R29vZ2xl/AVvXsEhyc2Hjhmt9HRK6NVieqgxjHVwjDCTduWzMFuZu8243XVSqHGMVNtq8-gbJgZu3KPw2S8Ok7QrPSlPTrVFPZlhnNRbFpkhg2eFBvHvNqse_wBp_Yx4I7fyCB23Sq4pFO-tdKTAjtgsJWSY/s200/Saudi+Arabia.png" style="cursor: pointer;margin-right:8px" width="24"/></a>

 <a class="google_translate" href="#" target="_blank" rel="nofollow" title="Chinese Simplified" onclick="window.open('http://translate.google.com/translate?u='+encodeURIComponent(location.href)+'&langpair=auto%7Czh-CN&hl=en'); return false;"><img alt="Chinese Simplified" border="0" align="absbottom" title="Chinese Simplified" height="24" src="https://blogger.googleusercontent.com/img/b/R29vZ2xl/AVvXsEh0i6T5aybrUhhQGY-wmFdKzClTRxnU_J1levfCGAkVKbZeSBPYArEW88Di6p1d7MAJDSVP68sKtQEs8xB9MNTk4UjkSZu2LJ__HOMiEMowbneg364qwTFPV2FT_GToMZSxUQb-8S4va50/s200/China.png" style="cursor: pointer;margin-right:8px" width="24"/></a>      </div>
  <div 0px 0pxâ?? style="â??font-size:10px;margin:8px" 3px></div>

 <br/>
        <a href="http://howtoalltools.blogspot.com/2012/02/how-to-add-language-translate-widget.html"><font size="2px">Click here to Get Widget</font></a>

<!--Language Translate widget-STOPS-->
<!--Language Translate widget End at here-->
  • Just save this.
  • You done this. If u like this Plz comment and subscribe us....!

How to Add Blogger Threaded Comment System - Blogger New Features


This is New Blogspot Feature. "Threaded comment system" recently which allows blog readers to make replies of existing comments. this will show like image blow. you can reply aslo comments of other members comments.This works just like DISQUS, Intense debate or Facebook comment form for blogspot. Blogger think that this is very importent for blogger and launched the Threaded comment system Now. Here is how you can enable threaded comment system on your blog.


Earlier bloggers use to add a custom reply button in blogger that helped users to reply comments of others but now Blogger has officially added this feature. Its a two level commenting system which means you can’t reply to comments which are added as a reply.

How to Enable Thread Comment System in Blogger ?

  • First Login to Your Blogger account.
  • and go Try the updated Blogger interface
  • and Embeded mode>>settings>> Post and comments  and follow images


  • Now Settings>>Other
  • and select Full


Its a good move by Blogger however there is still a need of more refine like nested commenting system with more levels to Reply. Hopefully Blogger will improve this updated comment system to meet the latest user requirements.
its done and enjoy always comment and say thanks...and subscribe us.

Saturday, 28 January 2012

How to Add Back To Top Button To Blogger Blog


Hi friend . Today I will tell you How to Add Back To Top Button To Blogger. Friend if u have lot of posts on your Blog and you want to make easy your blog for your vistors. Back to Top button make it easy for your vistors. They can explore your Blog faster and better. This is a good and fastest way and trick to go bottom to top. To add this in your Blog follow Steps Blow.

How to Add Back To Top Button To Blogger Blog :

  • To Add this follow these steps.
  • Login to your Blogger Account.
  • Goto Design>>Page Elements.
  • Now click on Add a Gadet.
  • Now select  HTML/Javascript
  • Now copy this folwoing Red code in Content the box.

<!--Back to top Start from here-->
<a alt="Back to Top" style="display:scroll;position:fixed;bottom:25px;right:5px;" href="#" title="Back to Top"><img onmouseover="this.src='https://blogger.googleusercontent.com/img/b/R29vZ2xl/AVvXsEjmRFXuwWWcvQE0b9xuDCZAgWs2hV8iJAWh-lNqxV1eHNYlzXp2DlLokX2_9vZYnZVsz56o_pe3KHayJW32mc-Y8NUhoP-G7mpEs4HJZ62tCd6XVcwMs53fTOH2ffZHOpC53v1uo3G8NZVF/s1600/BTT+large.gif'" src="https://blogger.googleusercontent.com/img/b/R29vZ2xl/AVvXsEh05yvT4kVbyU_HAJUGzJecjtp2OsM9XVyA69Qm0yWqKKCBTHRsLCA_xdGEnS4VgDRTPz7KUkIkAD6-nSMKJp4D1B4oHdG8p2U0KldI2TyM_-HWoC8B8MxOtSkVWNBbboNVRc11F_GqytvG/s1600/BTT+small.gif" onmouseout="this.src='https://blogger.googleusercontent.com/img/b/R29vZ2xl/AVvXsEh05yvT4kVbyU_HAJUGzJecjtp2OsM9XVyA69Qm0yWqKKCBTHRsLCA_xdGEnS4VgDRTPz7KUkIkAD6-nSMKJp4D1B4oHdG8p2U0KldI2TyM_-HWoC8B8MxOtSkVWNBbboNVRc11F_GqytvG/s1600/BTT+small.gif'" /></a>
<!--BACK to TOP-IMAGE-STOPS-->
<!--Back to top End at here-->
  • Just save this.
  • You done this. If u like this Plz comment and subscribe us....!

How to Add Floating ( Sliding ) Share Buttons To Blogger Sidebar


Hi friend you are her today to learn How to Add Floating ( Sliding ) Share Buttons To Blogger Sidebar. you must have seen in many wordpress or other blogs. Now i will tell you for Blogger how to add a floating share buttons widget.It will appear outsid of your post sections and as you scroll the page, this widget will also scroll with some animation effects.

How to Add Floating ( Sliding ) Share Buttons To Blogger Sidebar :

  •  To Add this follow these steps.
  • Login to your Blogger Account.
  • Goto Design>>Page Elements.
  • Now click on Add a Gadet.
  • Now select  HTML/Javascript
  • Now copy this folwoing Red code in Content the box.


<!-- floating share bar Start blogger4ever.com-->
<style type="text/css">
#pageshare {
float:left;
margin-left:-80px;
background: #fafafa;
position:fixed;
bottom:20%;
border:1px solid #e5e5e5;-webkit-border-radius:3px;-moz-border-radius:3px;border-radius:3px;}
#pageshare:hover {
background-color:#ffffff;-webkit-box-shadow:0px 2px 2px rgba(0,0,0,.1);-moz-box-shadow:0px 2px 2px rgba(0,0,0,.1);box-shadow:0px 2px 2px rgba(0,0,0,.1);}
#pageshare .sbutton {
float:left;clear:both;margin:5px 5px 0 5px;}</style>

<div id='pageshare' title="Get this Widget from    How To All Tools.com">
<div class='sbutton' id='tweet'>
<script src="http://platform.twitter.com/widgets.js" type="text/javascript"></script>
<a href="http://twitter.com/share" class="twitter-share-button" data-count="vertical" data-via="YOUR TWITTER USERNAME">Tweet</a> </div>
<div class='sbutton' id='su'>
<script src="http://www.stumbleupon.com/hostedbadge.php?s=5"></script>
</div>
<div class='sbutton' id='gplusone'>
<script type="text/javascript" src="https://apis.google.com/js/plusone.js"></script>
<g:plusone size="tall"></g:plusone> </div>
<div class='sbutton' id='fbshare'>
<div id="fb-root"></div>
<script>(function(d, s, id) {
var js, fjs = d.getElementsByTagName(s)[0];
if (d.getElementById(id)) return;
js = d.createElement(s); js.id = id;
js.src = "//connect.facebook.net/en_US/all.js#xfbml=1";
fjs.parentNode.insertBefore(js, fjs);
}(document, 'script', 'facebook-jssdk'));</script>
<div class="fb-like" data-send="true" data-layout="box_count" data-width="50" data-show-faces="false"></div></div>
<div style="clear: both;font-size: 10px;text-align:center;"><a href="http://howtoalltools.blogspot.com/2012/01/how-to-add-floating-sliding-share.html">Get Widget</a></div><!-- Do not remove this link --> </div>
<!-- floating share bar End --> 
  • Save it.
  • Drag it under Blog Post section.
  • You done it, Alway comment and subscribe us.

Friday, 27 January 2012

How to Add REPLY Comments Option in Blogger Comments

Hi friend you r here today to see How to Add REPLY Comments Option in Blogger Comments. Blogger is a free service From Google. Therefore, Blogger does not have such professional and other good looking functions which could satisfy need of everyone. So, time by time, Web developers search for blogger to enhance the blogger experience. And tthey done it. Now, you can add a “REPLY” button with each comment posted in your blogs pots, Now people can reply any comment easily. So, Simply to enable this feature in your blog, read instructions blow.

How to Add REPLY Comments Option in Blogger Comments :

  • First Login to Your Blogger Account
  • Go to Dashboard >> Design >>EDIT HTML.
  • Get Your Blog ID, You will be able to see your blog ID in URL address bar. for example, see this picture blow.

  •  Copy Your BLOG ID wich in green area.
Now find this code ( for find Press CTRL + F ) 
 
<data:commentPostedByMsg/>
  • Just after above code, past new below code
<span><a expr:href='&quot;https://www.blogger.com/comment.g?blogID=YOUR-BLOG-ID&amp;postID=&quot; + data:post.id + &quot;&amp;isPopup=true&amp;postBody=%40%3C%61%20%68%72%65%66%3D%22%23&quot; + data:comment.anchorName + &quot;%22%3E&quot; + data:comment.author + &quot;%3C%2F%61%3E#form&quot;' onclick='javascript:window.open(this.href, &quot;bloggerPopup&quot;, &quot;toolbar=0,location=0,statusbar=1,menubar=0,scrollbars=yes,width=450,height=450&quot;); return false;'>[Reply]</a></span>
  • Dont Forget to Change YOUR-BLOG-ID with your Blog ID that you searched following above instructions.
  • Preview of [Reply] Button

  • Save your template you done tihs. Don't forget to reply.

Thursday, 26 January 2012

How to Add Related Post With Thumbnail Widget in Blogger


Hi Friend's, Today i will tell you how to add related post with thumbnail widget. You know that Every one want to give professional look to his/her Blog. By adding Related Post With Thumbnail Widget your blog looks professional and it is also help to  increase your readership.
It is very important that you have Related Post With Thumbnail Widget on your blog. When a visitor comes on your blogs posts. They comes from search engines or other sources like from advertisemest or backlinks ETC. They will spend little time on your blog. After Adding this widget will help visitors discover more posts from your blog. You don’t need to know any HTML to follow this tutorial.

  • First open this Linkwithin
  • After that you will see like forum like image Blow.


  • First Enter your EMail Address.
  • After that Type your complete URL of Blog.
  • Platform: Select Blogger as your platform.
  • Width: Select Width that is suitable with the width of your Blogger template. 5 Stories works best with my blogger template.
  • Now, In the end of the form you can see “My Blog has light text on a dark background”. Check this box if your template's background is dark, otherwise leave it blank.
  • Click Get Widget.
Now you can see this screen and and after athis click on Add Widget


This will add in Page Elements. you can rearange as u like for your template. It's done

Wednesday, 25 January 2012

How to Add Facebook share Button for Blogger

Hi Friend, As you know that Twitter has Retweet Button, Now a time Facebook Also have Share Button. How it Works? Vistors from the world of your site when comes on your blog they can easily share your blog posts on facebook. This is aslo a Good way of SEO and increase your blog traffic.

Preview of Button :

.:: How to Add Facebook share Button ::.

This button will apear on the top right side of your blogger.

1. Follow this guide on How To Edit Your Blog Template

2. Find THis code. (CTRL+F)  <data:post.body/>

3. Add these codes ABOVE  <data:post.body/>

<!-- FACEBOOK SHARE BUTTON -->
<b:if cond='data:blog.pageType == "item"'>
<div style='float:right; margin-left:10px;'>
<a href='http://www.facebook.com/sharer.php' name='fb_share' type='box_count'>Share</a><script src='http://static.ak.fbcdn.net/connect.php/js/FB.Share' type='text/javascript'/>
</div>
<b:else/>
<div style='float:right; margin-left:10px;'>
<a href='http://www.facebook.com/sharer.php' name='fb_share' type='button_count'>Share</a><script src='http://static.ak.fbcdn.net/connect.php/js/FB.Share' type='text/javascript'/>
</div>
</b:if>
<!-- FACEBOOK SHARE BUTTON -->

4. Click Save Template
it's Done and always comments 

Tuesday, 24 January 2012

How to Add Retweet Button for Blogger

Hi Friend, you are here today because you want to aad Retweet button to your Blogger. Today i will tell you how to add retweet button to blogger. This is very easy and very helpful to improve your Blog traffic also.


1. Follow this guide on How To Edit Your Blog Template


 2. Find(CTRL+F)  <data:post.body/>

3. Add these codes ABOVE  <data:post.body/>


<b:if cond='data:blog.pageType == "item"'>
    <div style='float:right; margin-left:10px;'>
        <script type="text/javascript">
            tweetmeme_url = '<data:post.url/>';
        </script>
        <script type="text/javascript" src="http://tweetmeme.com/i/scripts/button.js"> </script>
    </div>
<b:else/>
    <div style='float:right; margin-left:10px;'>
        <script type="text/javascript">
            tweetmeme_url = '<data:post.url/>';
            tweetmeme_style = "compact";
        </script>
        <script type="text/javascript" src="http://tweetmeme.com/i/scripts/button.js"> </script>
    </div>
</b:if>

4. Click Save Template

And you're done! The retweet button will appear at the Top right side on your post.


Always comment and subscribe us.....!

Monday, 23 January 2012

How To Submit Blog Sitemap to Bing and Yahoo with Bing Webmaster Tools


Hi guys. you are here for how to submit your site to yahoo or Bing Webmaster Tools. Therefore You can  Drive more visitors to your site using Bing or yahoo. Vistors form search engines is really good way to increase ur traffic of  your website or Blog. Traffic form search engines is not costly is free of cost.
How To Submit Blog Sitemap to Bing and Yahoo with Bing Webmaster Tools :

  1. First login to Bing Webmaster tools. Click Here
  2. After this Add your site From Bing Dashboard


Verify your site After that select 2: Option for Verify

Copy Meta tag wich Bing gnerates for your site and copey this right after <head> Tag and save template you done this. Site will be indexed with in 3 or Days. Always comment and subscribe us....

Friday, 20 January 2012

How To Submit Blog Sitemap to Google with Google Webmaster Tools

Dear Users you know that Every Blog Owner wants to get traffic Mostly from Google. This is a Goal of every  Blog owner. So how do you get more traffic from google? There are many ways like Quality Content, Good punctuation, Good grammar, onsite and offsite optimization. Main and Important thing to drive traffic to your blog is Submission of site map in Google . When first Time i have added my blog sitemap to Webmaster, the sitemap added to webmaster but not all of my blog has index to webmaster. I have written almost 40 posts that time and it was showing 26 Urls submitted. I was worried about that and I searched on Google about my problem and then I found the answer. Today I will share with you how to add all blog sitemap to webmaster tools.


How to Add your blog to Google Webmaster Tool :

Goto Google webmaster tools.  If you haven't already added your blog to webmaster tool. Then click on Add a site Button.

How to Add sitemap to Webmaster Tool :

After adding your site to webmaster tool, you need to see at the right sidebar on Google webmaster tool there will be some links. Go to Site Site verification and verify ur site. and after verify ur site Then click Here After that click on your Blog and On the next page
Click on Submit a sitemap.


Now, copy the URL given below and paste it to that field. This is a basic sitemap; you need to submit it first. Click on Submit sitemap.


/atom.xml?redirect=false

Then enter the second sitemap. This is to index the first 100 posts on your blog, which means post number 1 until post number 100.


/atom.xml?redirect=false&start-index=1&max-results=100


 If you have more than 100 posts on your blog, submit this link as well. This will index post number 101 until post number 200.


/atom.xml?redirect=false&start-index=101&max-results=100

 If you have more than 200 posts on your blog, submit this link as well. It will index post201 until 300.


/atom.xml?redirect=false&start-index=201&max-results=100

If you have written 1000’s of posts, you have to submit sitemap after every 100 posts.

How to Change Older Post And Newer Post Link With Custom Text


How to Change Older Post And Newer Post Link With Custom Text :
First Login to ur Blogger account. Goto Layout>>Design>>Edit Html>>Expand Widget Templates
Now search For Codes Blow:

1. <data:newerPageTitle/> Which Displays NEWER POSTS in Ur template.

2. <data:olderPageTitle/> Which Displays OLDER POST in Ur template.

3. <data:homeMsg/> Which Displays HOME in Ur template.

Now you have to do wich given blow.

Remove <data:newerPageTitle/> This Code And Write PREVIOUS PAGE

Remove <data:olderPageTitle/> This Code And Write NEXT PAGE

Its Done You Have Added Older Post And Newer Post Link With Custom Text

How to Change Older Post And Newer Post Link With Image in Blogger

Change Older Post And Newer Post Link With icons or images in Blogger is very nice, cool stylish and amazing trick to make your blogs look attractive and Georgious.Here is the easy and simply way how to Change Older Post And Newer Post Link With Image in Blogger


How to Change Older Post And Newer Post Link With Image :

First Login to ur Blogger account. Goto Layout>>Design>>Edit Html>>Expand Widget Templates

After tht follow the steps blow.

Find Green codes and Replace with Red codes.

1. <data:newerPageTitle/>Which Displays NEWER POSTS in Ur template.

Replace With

<img src='http://i28.tinypic.com/dw8i13.png'/>

2. <data:olderPageTitle/> Which Displays OLDER POST in Ur template.

Replace With

<img src='http://i27.tinypic.com/2hzhe6d.png'/>

3. <data:homeMsg/> Which Displays HOME in your template.

Replace With

<img src='http://i25.tinypic.com/13yfc0j.png'/>
Save ur template. You have changed Older Post And Newer Post Link With Image

How to Add Danasoft Widget for Blogger, Wordpress or Websites

Danasoft sign is Very funny, Cool, stylish and amazing widget wich you can add to your blog, forum posts, or your website. You can also customize the graphic with your own messages or Custom Quote. When people see the sign, they will see all sorts of spooky information about them (it works like a one-way mirror), like their IP address, operating system (Windows, Mac), web browser type, along with your customized message at the bottom, You can published right on your profile, blog, or website. It also have a new city graphic that tells the person where they live, which is especially freaky.


How to Add Danasoft Widget :

First Go to Here

Selecte ur Code wich one you want to display on  ur Blog or Website. And after login to ur blogger account. Goto Dashboard>>Design>>Add a Gadget>>HTML/Javascript .


how+to+add+Html+java+script

Then past ur code and Save it. U done this. u have added Danasoft Widget  to your Blogger.

How to Add MapLoco Widget for Blogger, Wordpress or Websites

This Wiget is very cool and stylish. After adding this widget to ur Blog or website u can see where from come vistors on your site on World Map.

How to Add MapLoco Widget :

First Go to Here
Selecte ur Code wich one you want to display on  ur Blog or Website. And after login to ur blogger account. Goto Dashboard>>Design>>Add a Gadget>>HTML/Javascript .


how+to+add+Html+java+script

Then past ur code and Save it. U done this. u have added MapLoco Widget  to your Blogger.

How to Add Add Page Rank Button or Icon to your Blogger, Wordpress or Website - FREE!

After adding this cool stylish and simple Google Pagerank widget to your Blogger, Wordpress or Website you can view ur pagerank pages of ur blog or site. This is Free and nice tool. This will show in cool and small icon and show ur Google Pagerank.

How to Add Add Page Rank Button or Icon
First Go to Here


Selecte ur Code wich one you want to display on  ur Blog or Website. And after login to ur blogger account. Goto Dashboard>>Design>>Add a Gadget>>HTML/Javascript .


how+to+add+Html+java+script

Then past ur code and Save it. U done this. u have added Page Rank widget to your Blogger.

How to Add Vistors Counters For Blogger, Wordpress or Websites

After add Visitor counter to  blogger will give  you a complete view and information about your visitors, where frome they come and their county name, Flag, no's of Vistors, page impression, Page views, No of  unique visitors etc. Counters will also gave you total Structure in graph and And count Hits for your blogger page. Blogger aslo have a default visitor tracker Google ( Google Analytics )  but third party visitor counter has more advanced Tracker statistics services. they r very easy and cool in view.


In these days lot of sites they offers totally free visitor counter. You can add easily Vistor counter by using the following sites. Among all sites most popular sites are Google Analytics, StatCounter, Histats and SiteMeter. This sites are so popular for their feature and sophisticated services. You can try Google or SimilarSites to find this kind of sites. Some More Sites: EasyCounterFlagCounter WhatCounter Website-Hit-Counters AmazingCounters ActiveMeter Addfreestats HitsLog SimpleHitCounter Free-counters.co.uk

Subscribe and comment us...

How to Decorate ur Text For Blogger

Dear users you can Change ur Text or Links Animated Text decoration Effect. This is very cool and stylish effect that will attrect vistors to ur Blog. u can see its preview blow.


Preview of Animated Decoreted Text effect :

How To All Tools - Top tutriols, Tool & Tips


Why Google Adsense Application Rejected - Unacceptable Site Content


Facebook Comments Box For Blogger In Very Easiest and Simple Steps ( Full Tutriol )


How to add an Animated Twitter Bird to Blogger and WordPress


How to Add Animated Decorated Text Effect :


.::Code For Blogger::.

<a target="_blank" href="Put Ur Address Here
"><span style="font-size: 8pt; text-decoration:blink">Put Ur Text Here
</span></a>

Note :- If u want to add this text decoration code In HTML/JavaScript
U have to Add this code showing blow.

</li><a target="_blank" href="Put Ur Address Here
"><span style="font-size: 8pt; text-decoration:blink">Put Ur Text Here
</span></a></li>


Be sure u Change "Put Ur Address" or "Put Ur Text"

Possible Values

  Value-------------Description

►none -------------  Defines a normal text. This is default
►underline ----------   Defines a line below the text
►overline ------------- Defines a line above the text
►line-through --------- Defines a line through the text
►blink ---------------- Defines a blinking text
►inherit -------------- Specifies that the value of the text-decoration property should be inherited from the parent element


Browser Support

►The text-decoration property is supported in all major browsers.
►No versions of Internet Explorer (including IE8) support the property value "inherit".
►The "blink" value is not supported in IE, Chrome, or Safari.

Its done. Comments and subscribe us.

How to Upgrade The Old facebook Comments Box in New style in Blogger.


Hi all, As we all know that  facebook released an upgrade version of the comments box plugin, with  great features, So all users of my site who used the old tutorial was wondering how to upgrade the comments box without loosing the current comments,

How to Upgrade Old Facebook Comment Box to New One

Please note: This post only explain how to upgrade the Old Facebook comments box for the users who already installed Old Facebook Comment box Plugin, If you want to install it from the starting, Then follow this tutorial.
Warning : Before you start applying any changes to your blogger template code, We encourage you to Backup it, by clicking on Download Full Template link.
Now just go to your blogger account, and then goto Blogger Dashboard >>> design >> >edit html , and then check expand template widgets box, Now find the following code, ( press Ctrl + F to find )

<fb:comments 
And replace it with
<script src='http://connect.facebook.net/en_US/all.js#xfbml=1'/> <fb:comments migrated='1' 
please make sure to copy all the code including the space after the code,
Now click Save Template , It's Done.
To View the new comments box Tutriol and features, Then View this tutorial.

Always comment and Subscibe us.