إعلانات

Software Request

Contact us

Softwares

Games

Showing posts with label S.E.O Tips. Show all posts

Friday, 3 February 2012

How to Add Language Translate widget for Blogger


Hi friends you are here tody because u learn how to add language translate widget in blogger. This is very cools and stylish trick to increse your blogger vistors. If any vistor can't understand English easily he/she can change langualge as he/she want or require. This widget will aslo help to increase your bogger traffic and vistor will like to visit your blog. They love to stay and spend time on your blogger.To add Language Translate widget in your blogger follow steps blow.

How to Add Language Translate widget  for Blogger :

  • To Add this follow these steps.
  • Login to your Blogger Account.
  • Goto Design>>Page Elements.
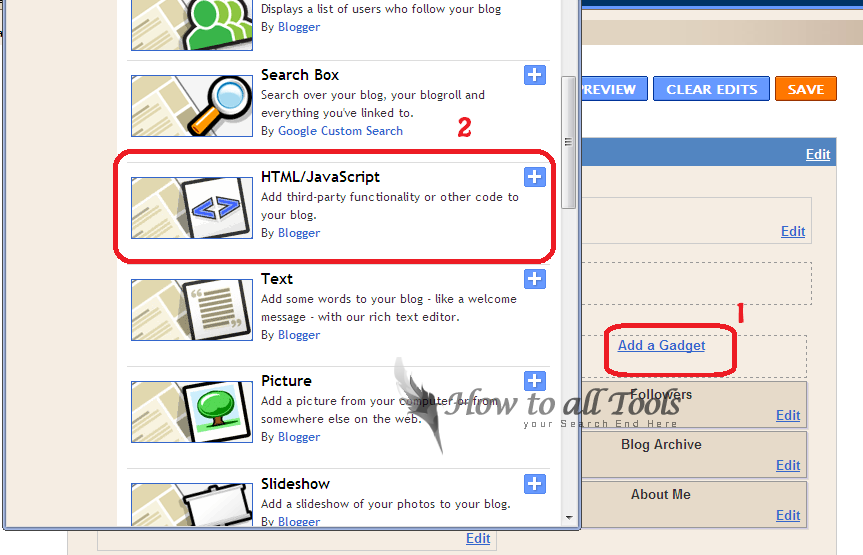
  • Now click on Add a Gadet.
  • Now select  HTML/Javascript
  • Now copy this folwoing code in Content the box.

<!--Language Translate widget Start from here-->
<style>

 .google_translate img {
        filter:alpha(opacity=100);
        -moz-opacity: 1.0;
        opacity: 1.0;
        border:0;
        }
        .google_translate:hover img {
        filter:alpha(opacity=30);
        -moz-opacity: 0.30;
        opacity: 0.30;
        border:0;
        }
        .google_translatextra:hover img {
        filter:alpha(opacity=0.30);
        -moz-opacity: 0.30;
        opacity: 0.30;
        border:0;
        }
  </style>

 <div>

 <a class="google_translate" href="#" target="_blank" rel="nofollow" title="English" onclick="window.open('http://translate.google.com/translate?u='+encodeURIComponent(location.href)+'&langpair=auto%7Cen&hl=en'); return false;"><img alt="English" border="0" align="absbottom" title="English" height="24" src="https://blogger.googleusercontent.com/img/b/R29vZ2xl/AVvXsEhrgID6MwbE2tE1pWIaqXzrQHyiWc7fQH7RorCiRvs0-xEv86TkiNnbPDU5iQYzFy8QKZUSAiJu74YXKdI9W0GAZIl458U19maoFqOXU04PXC3DiDaiRiWZR_f5UZxEwGGDjMXxwXXJkuw/s200/United+Kingdom(Great+Britain).png" style="cursor: pointer;margin-right:8px" width="24"/></a>

 <a class="google_translate" href="#" target="_blank" rel="nofollow" title="French" onclick="window.open('http://translate.google.com/translate?u='+encodeURIComponent(location.href)+'&langpair=auto%7Cfr&hl=en'); return false;"><img alt="French" border="0" align="absbottom" title="French" height="24" src="https://blogger.googleusercontent.com/img/b/R29vZ2xl/AVvXsEhGJuAUavcWvVvPj2hBafMk3WJQU6nDW2PuB91ELMzrVnc5B8Xx983f3VvJLx-DZtHoM-LDfRRI4qkn2SKB6mstjv2Bht-qELwid-hY-ssSGWEp52ASwL4Sg5IrPcxjD7Af4hgxCbHnBBA/s200/France.png" style="cursor: pointer;margin-right:8px" width="24"/></a>

 <a class="google_translate" href="#" target="_blank" rel="nofollow" title="German" onclick="window.open('http://translate.google.com/translate?u='+encodeURIComponent(location.href)+'&langpair=auto%7Cde&hl=en'); return false;"><img alt="German" border="0" align="absbottom" title="German" height="24" src="https://blogger.googleusercontent.com/img/b/R29vZ2xl/AVvXsEh7rqdg7zKELRGmpgWjCLvCJldaUeAeidTDdTVbVK4Y3pPFaus5Fu185Wfp84Rnvic6uxAb6QgzWGT1GXzTYEFUibrwCuYA21sAlyP3dRgkRxxwOT2yrgGK-CIW3JbCBJsIxNLG-In3HNk/s200/Germany.png" style="cursor: pointer;margin-right:8px" width="24"/></a>

 <a class="google_translate" href="#" target="_blank" rel="nofollow" title="Spain" onclick="window.open('http://translate.google.com/translate?u='+encodeURIComponent(location.href)+'&langpair=auto%7Ces&hl=en'); return false;"><img alt="Spain" border="0" align="absbottom" title="Spain" height="24" src="https://blogger.googleusercontent.com/img/b/R29vZ2xl/AVvXsEib32hmhvYhwVVnGCOWZ4O-cOkrEm1X8N2z3AAex6u3xC7K56WN2RdVaHq7F8vbtfkpSwack4sed14N7OpMD0xdaCjhqzWG6eFx1efNqVi3URHm0_AjAPQWhdqV2Uzpnm9kyqGjGaVWgE4/s200/Spain.png" style="cursor: pointer;margin-right:8px" width="24"/></a>

 <a class="google_translate" href="#" target="_blank" rel="nofollow" title="Italian" onclick="window.open('http://translate.google.com/translate?u='+encodeURIComponent(location.href)+'&langpair=auto%7Cit&hl=en'); return false;"><img alt="Italian" border="0" align="absbottom" title="Italian" height="24" src="https://blogger.googleusercontent.com/img/b/R29vZ2xl/AVvXsEhL4nJWdFTs7GxWbCn2wiO-BnPlxryJfgi6Id-Q_Gg201tVw3io2SPtc933_QW3ZmO81-IdNWs8TkpGrsUUbn5_IZocUIbk9t2fMbeAco2pU8fYkAA1tivlLnRd2gDq2CeobvnlBJ6XqEk/s200/Italy.png" style="cursor: pointer;margin-right:8px" width="24"/></a>

 <a class="google_translate" href="#" target="_blank" rel="nofollow" title="Dutch" onclick="window.open('http://translate.google.com/translate?u='+encodeURIComponent(location.href)+'&langpair=auto%7Cnl&hl=en'); return false;"><img alt="Dutch" border="0" align="absbottom" title="Dutch" height="24" src="https://blogger.googleusercontent.com/img/b/R29vZ2xl/AVvXsEgak9FO3IZ8arTv9r9r22X9014j5GhaxIir51SlxTia5YkTWWlwldagawaJF4VdW9E0Zl5Y79XHlCzSlHPbqH7d7puLsme3ZCyRxYH4cD_v17mU9bsEGHAaFZtGx5iYLIxal6Trb5p-Mzw/s200/Netherlands.png" style="cursor: pointer;margin-right:8px" width="24"/></a>
      <a class="google_translate" href="#" target="_blank" rel="nofollow" title="Russian" onclick="window.open('http://translate.google.com/translate?u='+encodeURIComponent(location.href)+'&langpair=auto%7Cru&hl=en'); return false;"><img alt="Russian" border="0" align="absbottom" title="Russian" height="24" src="https://blogger.googleusercontent.com/img/b/R29vZ2xl/AVvXsEiF60tGNE7iZqPouE46ubhltbPidND7AWSt1fYhduDfPRDDG2fzG3Nr41RfDr4Z-jreuCkKbq_0VYU5IA3LXb_dIoS20LhtupQCnfg4Xo6mdp8OvaJ3L5djqIJz0I6FrwK172SAk_no96w/s200/Russian+Federation.png" style="cursor: pointer;margin-right:8px" width="24"/></a>

 <a class="google_translate" href="#" target="_blank" rel="nofollow" title="Portuguese" onclick="window.open('http://translate.google.com/translate?u='+encodeURIComponent(location.href)+'&langpair=auto%7Cpt&hl=en'); return false;"><img alt="Portuguese" border="0" align="absbottom" title="Portuguese" height="24" src="https://blogger.googleusercontent.com/img/b/R29vZ2xl/AVvXsEhqwe8TQTXevSEhKMb7xMPlZNfdoIHauGLNGpfPiykH08tWR5yD5tq6MZU0pg2-ZMRhqXBhi1WZ9wuUiOk8cU-lmxN3dW4ddbWZgLNvYot0PnMSFn9buxWq5k6VqdEgo9sxkOmIInJCSu4/s200/Brazil.png" style="cursor: pointer;margin-right:8px" width="24"/></a>

 <a class="google_translate" href="#" target="_blank" rel="nofollow" title="Japanese" onclick="window.open('http://translate.google.com/translate?u='+encodeURIComponent(location.href)+'&langpair=auto%7Cja&hl=en'); return false;"><img alt="Japanese" border="0" align="absbottom" title="Japanese" height="24" src="https://blogger.googleusercontent.com/img/b/R29vZ2xl/AVvXsEgau3OK47EI9Eg6XDrMueYcdzojCvjJYpbbFBJwsTfJegHJzl5ADF0VcjCvxFDczfa0fcpgpvfcoxuVOTjYGbjo2Qyrt5jmrqxaOU4rmA089lr8h6MWFqHCbdim0dE-ShsU-sA3j2O0ffw/s200/Japan.png" style="cursor: pointer;margin-right:8px" width="24"/></a>

 <a class="google_translate" href="#" target="_blank" rel="nofollow" title="Korean" onclick="window.open('http://translate.google.com/translate?u='+encodeURIComponent(location.href)+'&langpair=auto%7Cko&hl=en'); return false;"><img alt="Korean" border="0" align="absbottom" title="Korean" height="24" src="https://blogger.googleusercontent.com/img/b/R29vZ2xl/AVvXsEg47_NpJbXcAWWiHp9YUrYr9B33F2TkF45LeRRAgFp7zUpqJP4Gf9qAvQKza6J0ySRVQ3w9wvgKZBQuCJIzBBHXQdD5EkmfcV4cjjcCw23YtdONDlw_SB7vfAziII3VOHZNwJys-h6_b-8/s200/South+Korea.png" style="cursor: pointer;margin-right:8px" width="24"/></a>

 <a class="google_translate" href="#" target="_blank" rel="nofollow" title="Arabic" onclick="window.open('http://translate.google.com/translate?u='+encodeURIComponent(location.href)+'&langpair=auto%7Car&hl=en'); return false;"><img alt="Arabic" border="0" align="absbottom" title="Arabic" height="24" src="https://blogger.googleusercontent.com/img/b/R29vZ2xl/AVvXsEhyc2Hjhmt9HRK6NVieqgxjHVwjDCTduWzMFuZu8243XVSqHGMVNtq8-gbJgZu3KPw2S8Ok7QrPSlPTrVFPZlhnNRbFpkhg2eFBvHvNqse_wBp_Yx4I7fyCB23Sq4pFO-tdKTAjtgsJWSY/s200/Saudi+Arabia.png" style="cursor: pointer;margin-right:8px" width="24"/></a>

 <a class="google_translate" href="#" target="_blank" rel="nofollow" title="Chinese Simplified" onclick="window.open('http://translate.google.com/translate?u='+encodeURIComponent(location.href)+'&langpair=auto%7Czh-CN&hl=en'); return false;"><img alt="Chinese Simplified" border="0" align="absbottom" title="Chinese Simplified" height="24" src="https://blogger.googleusercontent.com/img/b/R29vZ2xl/AVvXsEh0i6T5aybrUhhQGY-wmFdKzClTRxnU_J1levfCGAkVKbZeSBPYArEW88Di6p1d7MAJDSVP68sKtQEs8xB9MNTk4UjkSZu2LJ__HOMiEMowbneg364qwTFPV2FT_GToMZSxUQb-8S4va50/s200/China.png" style="cursor: pointer;margin-right:8px" width="24"/></a>      </div>
  <div 0px 0pxâ?? style="â??font-size:10px;margin:8px" 3px></div>

 <br/>
        <a href="http://howtoalltools.blogspot.com/2012/02/how-to-add-language-translate-widget.html"><font size="2px">Click here to Get Widget</font></a>

<!--Language Translate widget-STOPS-->
<!--Language Translate widget End at here-->
  • Just save this.
  • You done this. If u like this Plz comment and subscribe us....!

How to Add Blogger Threaded Comment System - Blogger New Features


This is New Blogspot Feature. "Threaded comment system" recently which allows blog readers to make replies of existing comments. this will show like image blow. you can reply aslo comments of other members comments.This works just like DISQUS, Intense debate or Facebook comment form for blogspot. Blogger think that this is very importent for blogger and launched the Threaded comment system Now. Here is how you can enable threaded comment system on your blog.


Earlier bloggers use to add a custom reply button in blogger that helped users to reply comments of others but now Blogger has officially added this feature. Its a two level commenting system which means you can’t reply to comments which are added as a reply.

How to Enable Thread Comment System in Blogger ?

  • First Login to Your Blogger account.
  • and go Try the updated Blogger interface
  • and Embeded mode>>settings>> Post and comments  and follow images


  • Now Settings>>Other
  • and select Full


Its a good move by Blogger however there is still a need of more refine like nested commenting system with more levels to Reply. Hopefully Blogger will improve this updated comment system to meet the latest user requirements.
its done and enjoy always comment and say thanks...and subscribe us.

Saturday, 28 January 2012

How to Add Back To Top Button To Blogger Blog


Hi friend . Today I will tell you How to Add Back To Top Button To Blogger. Friend if u have lot of posts on your Blog and you want to make easy your blog for your vistors. Back to Top button make it easy for your vistors. They can explore your Blog faster and better. This is a good and fastest way and trick to go bottom to top. To add this in your Blog follow Steps Blow.

How to Add Back To Top Button To Blogger Blog :

  • To Add this follow these steps.
  • Login to your Blogger Account.
  • Goto Design>>Page Elements.
  • Now click on Add a Gadet.
  • Now select  HTML/Javascript
  • Now copy this folwoing Red code in Content the box.

<!--Back to top Start from here-->
<a alt="Back to Top" style="display:scroll;position:fixed;bottom:25px;right:5px;" href="#" title="Back to Top"><img onmouseover="this.src='https://blogger.googleusercontent.com/img/b/R29vZ2xl/AVvXsEjmRFXuwWWcvQE0b9xuDCZAgWs2hV8iJAWh-lNqxV1eHNYlzXp2DlLokX2_9vZYnZVsz56o_pe3KHayJW32mc-Y8NUhoP-G7mpEs4HJZ62tCd6XVcwMs53fTOH2ffZHOpC53v1uo3G8NZVF/s1600/BTT+large.gif'" src="https://blogger.googleusercontent.com/img/b/R29vZ2xl/AVvXsEh05yvT4kVbyU_HAJUGzJecjtp2OsM9XVyA69Qm0yWqKKCBTHRsLCA_xdGEnS4VgDRTPz7KUkIkAD6-nSMKJp4D1B4oHdG8p2U0KldI2TyM_-HWoC8B8MxOtSkVWNBbboNVRc11F_GqytvG/s1600/BTT+small.gif" onmouseout="this.src='https://blogger.googleusercontent.com/img/b/R29vZ2xl/AVvXsEh05yvT4kVbyU_HAJUGzJecjtp2OsM9XVyA69Qm0yWqKKCBTHRsLCA_xdGEnS4VgDRTPz7KUkIkAD6-nSMKJp4D1B4oHdG8p2U0KldI2TyM_-HWoC8B8MxOtSkVWNBbboNVRc11F_GqytvG/s1600/BTT+small.gif'" /></a>
<!--BACK to TOP-IMAGE-STOPS-->
<!--Back to top End at here-->
  • Just save this.
  • You done this. If u like this Plz comment and subscribe us....!

How to Add Floating ( Sliding ) Share Buttons To Blogger Sidebar


Hi friend you are her today to learn How to Add Floating ( Sliding ) Share Buttons To Blogger Sidebar. you must have seen in many wordpress or other blogs. Now i will tell you for Blogger how to add a floating share buttons widget.It will appear outsid of your post sections and as you scroll the page, this widget will also scroll with some animation effects.

How to Add Floating ( Sliding ) Share Buttons To Blogger Sidebar :

  •  To Add this follow these steps.
  • Login to your Blogger Account.
  • Goto Design>>Page Elements.
  • Now click on Add a Gadet.
  • Now select  HTML/Javascript
  • Now copy this folwoing Red code in Content the box.


<!-- floating share bar Start blogger4ever.com-->
<style type="text/css">
#pageshare {
float:left;
margin-left:-80px;
background: #fafafa;
position:fixed;
bottom:20%;
border:1px solid #e5e5e5;-webkit-border-radius:3px;-moz-border-radius:3px;border-radius:3px;}
#pageshare:hover {
background-color:#ffffff;-webkit-box-shadow:0px 2px 2px rgba(0,0,0,.1);-moz-box-shadow:0px 2px 2px rgba(0,0,0,.1);box-shadow:0px 2px 2px rgba(0,0,0,.1);}
#pageshare .sbutton {
float:left;clear:both;margin:5px 5px 0 5px;}</style>

<div id='pageshare' title="Get this Widget from    How To All Tools.com">
<div class='sbutton' id='tweet'>
<script src="http://platform.twitter.com/widgets.js" type="text/javascript"></script>
<a href="http://twitter.com/share" class="twitter-share-button" data-count="vertical" data-via="YOUR TWITTER USERNAME">Tweet</a> </div>
<div class='sbutton' id='su'>
<script src="http://www.stumbleupon.com/hostedbadge.php?s=5"></script>
</div>
<div class='sbutton' id='gplusone'>
<script type="text/javascript" src="https://apis.google.com/js/plusone.js"></script>
<g:plusone size="tall"></g:plusone> </div>
<div class='sbutton' id='fbshare'>
<div id="fb-root"></div>
<script>(function(d, s, id) {
var js, fjs = d.getElementsByTagName(s)[0];
if (d.getElementById(id)) return;
js = d.createElement(s); js.id = id;
js.src = "//connect.facebook.net/en_US/all.js#xfbml=1";
fjs.parentNode.insertBefore(js, fjs);
}(document, 'script', 'facebook-jssdk'));</script>
<div class="fb-like" data-send="true" data-layout="box_count" data-width="50" data-show-faces="false"></div></div>
<div style="clear: both;font-size: 10px;text-align:center;"><a href="http://howtoalltools.blogspot.com/2012/01/how-to-add-floating-sliding-share.html">Get Widget</a></div><!-- Do not remove this link --> </div>
<!-- floating share bar End --> 
  • Save it.
  • Drag it under Blog Post section.
  • You done it, Alway comment and subscribe us.

Thursday, 26 January 2012

How to Add Related Post With Thumbnail Widget in Blogger


Hi Friend's, Today i will tell you how to add related post with thumbnail widget. You know that Every one want to give professional look to his/her Blog. By adding Related Post With Thumbnail Widget your blog looks professional and it is also help to  increase your readership.
It is very important that you have Related Post With Thumbnail Widget on your blog. When a visitor comes on your blogs posts. They comes from search engines or other sources like from advertisemest or backlinks ETC. They will spend little time on your blog. After Adding this widget will help visitors discover more posts from your blog. You don’t need to know any HTML to follow this tutorial.

  • First open this Linkwithin
  • After that you will see like forum like image Blow.


  • First Enter your EMail Address.
  • After that Type your complete URL of Blog.
  • Platform: Select Blogger as your platform.
  • Width: Select Width that is suitable with the width of your Blogger template. 5 Stories works best with my blogger template.
  • Now, In the end of the form you can see “My Blog has light text on a dark background”. Check this box if your template's background is dark, otherwise leave it blank.
  • Click Get Widget.
Now you can see this screen and and after athis click on Add Widget


This will add in Page Elements. you can rearange as u like for your template. It's done

Wednesday, 25 January 2012

How to Add Facebook share Button for Blogger

Hi Friend, As you know that Twitter has Retweet Button, Now a time Facebook Also have Share Button. How it Works? Vistors from the world of your site when comes on your blog they can easily share your blog posts on facebook. This is aslo a Good way of SEO and increase your blog traffic.

Preview of Button :

.:: How to Add Facebook share Button ::.

This button will apear on the top right side of your blogger.

1. Follow this guide on How To Edit Your Blog Template

2. Find THis code. (CTRL+F)  <data:post.body/>

3. Add these codes ABOVE  <data:post.body/>

<!-- FACEBOOK SHARE BUTTON -->
<b:if cond='data:blog.pageType == "item"'>
<div style='float:right; margin-left:10px;'>
<a href='http://www.facebook.com/sharer.php' name='fb_share' type='box_count'>Share</a><script src='http://static.ak.fbcdn.net/connect.php/js/FB.Share' type='text/javascript'/>
</div>
<b:else/>
<div style='float:right; margin-left:10px;'>
<a href='http://www.facebook.com/sharer.php' name='fb_share' type='button_count'>Share</a><script src='http://static.ak.fbcdn.net/connect.php/js/FB.Share' type='text/javascript'/>
</div>
</b:if>
<!-- FACEBOOK SHARE BUTTON -->

4. Click Save Template
it's Done and always comments 

Tuesday, 24 January 2012

How to Edit your Blog Template

Hi Friends Today i will tell you How to edit your Blog template. This will help you in all How to posts. Spesially for biggners.


  • After Login to your blogger account
  • Now you will see your blogger dashboard
  • Now Click Design on your required blog if u have more then one.
  • Now Click on Edit HTML

  • Now Click on Download Full Template to Save/Backup your Template.

Question is why do you need to download your full template? Downloading your template lets you have a backup of your template. So in case something bad happened or some error occurred with your template according changes that you cannot fix, you can simply upload your backup.

  • Now Click on Expand Widget Template


  • It's Done......!   Now  you can customize your template as you want

How to Add Retweet Button for Blogger

Hi Friend, you are here today because you want to aad Retweet button to your Blogger. Today i will tell you how to add retweet button to blogger. This is very easy and very helpful to improve your Blog traffic also.


1. Follow this guide on How To Edit Your Blog Template


 2. Find(CTRL+F)  <data:post.body/>

3. Add these codes ABOVE  <data:post.body/>


<b:if cond='data:blog.pageType == "item"'>
    <div style='float:right; margin-left:10px;'>
        <script type="text/javascript">
            tweetmeme_url = '<data:post.url/>';
        </script>
        <script type="text/javascript" src="http://tweetmeme.com/i/scripts/button.js"> </script>
    </div>
<b:else/>
    <div style='float:right; margin-left:10px;'>
        <script type="text/javascript">
            tweetmeme_url = '<data:post.url/>';
            tweetmeme_style = "compact";
        </script>
        <script type="text/javascript" src="http://tweetmeme.com/i/scripts/button.js"> </script>
    </div>
</b:if>

4. Click Save Template

And you're done! The retweet button will appear at the Top right side on your post.


Always comment and subscribe us.....!

Monday, 23 January 2012

How To Submit Blog Sitemap to Bing and Yahoo with Bing Webmaster Tools


Hi guys. you are here for how to submit your site to yahoo or Bing Webmaster Tools. Therefore You can  Drive more visitors to your site using Bing or yahoo. Vistors form search engines is really good way to increase ur traffic of  your website or Blog. Traffic form search engines is not costly is free of cost.
How To Submit Blog Sitemap to Bing and Yahoo with Bing Webmaster Tools :

  1. First login to Bing Webmaster tools. Click Here
  2. After this Add your site From Bing Dashboard


Verify your site After that select 2: Option for Verify

Copy Meta tag wich Bing gnerates for your site and copey this right after <head> Tag and save template you done this. Site will be indexed with in 3 or Days. Always comment and subscribe us....

Friday, 20 January 2012

How To Submit Blog Sitemap to Google with Google Webmaster Tools

Dear Users you know that Every Blog Owner wants to get traffic Mostly from Google. This is a Goal of every  Blog owner. So how do you get more traffic from google? There are many ways like Quality Content, Good punctuation, Good grammar, onsite and offsite optimization. Main and Important thing to drive traffic to your blog is Submission of site map in Google . When first Time i have added my blog sitemap to Webmaster, the sitemap added to webmaster but not all of my blog has index to webmaster. I have written almost 40 posts that time and it was showing 26 Urls submitted. I was worried about that and I searched on Google about my problem and then I found the answer. Today I will share with you how to add all blog sitemap to webmaster tools.


How to Add your blog to Google Webmaster Tool :

Goto Google webmaster tools.  If you haven't already added your blog to webmaster tool. Then click on Add a site Button.

How to Add sitemap to Webmaster Tool :

After adding your site to webmaster tool, you need to see at the right sidebar on Google webmaster tool there will be some links. Go to Site Site verification and verify ur site. and after verify ur site Then click Here After that click on your Blog and On the next page
Click on Submit a sitemap.


Now, copy the URL given below and paste it to that field. This is a basic sitemap; you need to submit it first. Click on Submit sitemap.


/atom.xml?redirect=false

Then enter the second sitemap. This is to index the first 100 posts on your blog, which means post number 1 until post number 100.


/atom.xml?redirect=false&start-index=1&max-results=100


 If you have more than 100 posts on your blog, submit this link as well. This will index post number 101 until post number 200.


/atom.xml?redirect=false&start-index=101&max-results=100

 If you have more than 200 posts on your blog, submit this link as well. It will index post201 until 300.


/atom.xml?redirect=false&start-index=201&max-results=100

If you have written 1000’s of posts, you have to submit sitemap after every 100 posts.

How to Add Alexa Widget for Blogger, Wordpress or Websites


Alexa Widget is very cool, stylish and importent widget for ur blog or website. u can easily add this widget to ur website or blogger.

Click Here To Add Alexa Widgets In Ur Blog

How to Add Add Page Rank Button or Icon to your Blogger, Wordpress or Website - FREE!

After adding this cool stylish and simple Google Pagerank widget to your Blogger, Wordpress or Website you can view ur pagerank pages of ur blog or site. This is Free and nice tool. This will show in cool and small icon and show ur Google Pagerank.

How to Add Add Page Rank Button or Icon
First Go to Here


Selecte ur Code wich one you want to display on  ur Blog or Website. And after login to ur blogger account. Goto Dashboard>>Design>>Add a Gadget>>HTML/Javascript .


how+to+add+Html+java+script

Then past ur code and Save it. U done this. u have added Page Rank widget to your Blogger.

How to Add Vistors Counters For Blogger, Wordpress or Websites

After add Visitor counter to  blogger will give  you a complete view and information about your visitors, where frome they come and their county name, Flag, no's of Vistors, page impression, Page views, No of  unique visitors etc. Counters will also gave you total Structure in graph and And count Hits for your blogger page. Blogger aslo have a default visitor tracker Google ( Google Analytics )  but third party visitor counter has more advanced Tracker statistics services. they r very easy and cool in view.


In these days lot of sites they offers totally free visitor counter. You can add easily Vistor counter by using the following sites. Among all sites most popular sites are Google Analytics, StatCounter, Histats and SiteMeter. This sites are so popular for their feature and sophisticated services. You can try Google or SimilarSites to find this kind of sites. Some More Sites: EasyCounterFlagCounter WhatCounter Website-Hit-Counters AmazingCounters ActiveMeter Addfreestats HitsLog SimpleHitCounter Free-counters.co.uk

Subscribe and comment us...

How to Decorate ur Text For Blogger

Dear users you can Change ur Text or Links Animated Text decoration Effect. This is very cool and stylish effect that will attrect vistors to ur Blog. u can see its preview blow.


Preview of Animated Decoreted Text effect :

How To All Tools - Top tutriols, Tool & Tips


Why Google Adsense Application Rejected - Unacceptable Site Content


Facebook Comments Box For Blogger In Very Easiest and Simple Steps ( Full Tutriol )


How to add an Animated Twitter Bird to Blogger and WordPress


How to Add Animated Decorated Text Effect :


.::Code For Blogger::.

<a target="_blank" href="Put Ur Address Here
"><span style="font-size: 8pt; text-decoration:blink">Put Ur Text Here
</span></a>

Note :- If u want to add this text decoration code In HTML/JavaScript
U have to Add this code showing blow.

</li><a target="_blank" href="Put Ur Address Here
"><span style="font-size: 8pt; text-decoration:blink">Put Ur Text Here
</span></a></li>


Be sure u Change "Put Ur Address" or "Put Ur Text"

Possible Values

  Value-------------Description

►none -------------  Defines a normal text. This is default
►underline ----------   Defines a line below the text
►overline ------------- Defines a line above the text
►line-through --------- Defines a line through the text
►blink ---------------- Defines a blinking text
►inherit -------------- Specifies that the value of the text-decoration property should be inherited from the parent element


Browser Support

►The text-decoration property is supported in all major browsers.
►No versions of Internet Explorer (including IE8) support the property value "inherit".
►The "blink" value is not supported in IE, Chrome, or Safari.

Its done. Comments and subscribe us.

Thursday, 5 January 2012

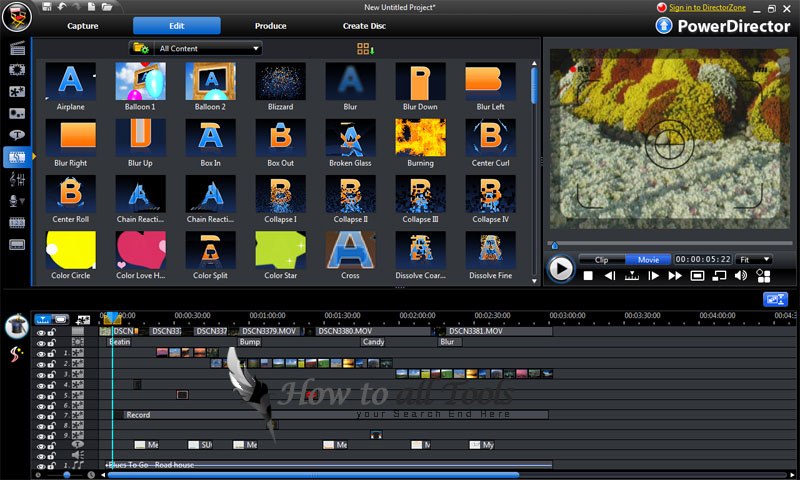
How to Edit your video and upload to youtube. Best Video Editing Program PowerDirector tutriol


CyberLink PowerDirector 6 creates high-definition (HD) movies fast & easy to share on YouTube and vlogs. Video editing has never been so fun or easy with Windows Vista-certified PowerDirector 6. Edit all your HD movies with PowerDirector’s creativity-inducing designers and 300+ effects that have left major media publications gushing. For beginners and experts alike, PowerDirector’s production time has increased 500% with easy & flexible exporting features including instant uploading to YouTube.com!


.:: Tutriol and Information ::.


.:: Dowload  Cyberlink Power Director  ::.

FileSonic 2 Parts
Part 1- 400 Mb
Part 2 - 189 MB

Fileserve 2 parts
Part 1
Part 2

Rapidshare 3 Parts

Part 1
Part 2
Part 3

Wupload 2 Parts
Part 1
Part 2

Saturday, 31 December 2011

7 Benefits of NoFollow -How to Make All External Links NoFollow Automatically


There r Greatest ways of Search Engine optimization of ur Blogger is making all of external link nofollow. Nofollow tags helps our blog to have fixed ranking in Google or other search engines. In fact, when Search engine robots come on our blog robots see all links wich we placed in our Blogger. Actually, its an intellectual to keep those search engine robots on our blog and let them index ( add - read ) only our blgger posts. But your link juice is not shared with others which is the cause a fixed Google pagerank. And there a aslo many other benfits of Nofollow tags.

More Benefits of NoFollow tag

  • You share only human traffic through the link and does not share Search Engine traffic
  • Google and other search engines algorithms have become better today, they might find it suspicious that a website has only "dofollow" backlinks. So, having external nofollow tags will let search engines fall in love with your blog.
  • Backlinking to some illegal websites (torrent, warez etc) may cause your blog SERPs. Having them nofollow wouldn't let search engines let impact your rank in search results.
  • It will improve your SEO as its all about SEO.
  • Google Also suggests nofollow tags if you have paid links. So, its better to follow Google's suggestion.
  • and so on...

How to Make nofollow tags Manually

  • Its very easy to make links "nofollow"; Just add an extra code (written in red color) in hyper link sample of tag is given blow.
 <a href="http://www.folsol.com/" rel="nofollow">

How to Make All External Links nofollow Automatically

It is very hard if we make all external links nofollow manually. But Dont worry abut this, here is a simple and easiest script to make all external links nofollow automatically, it only takes few minutes;

  • Login to ur Blogge account, go to Dashboard > Design > Edit HTML otherwise move to next step
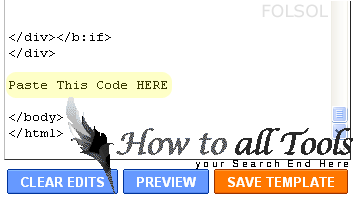
  • Search for </body> (tip: press CTRL and F at once and copy paste this code)
  • Copy-Paste below given code Just Before searched code.
  • <script src='http://ajax.googleapis.com/ajax/libs/jquery/1.3.2/jquery.min.js' type='text/javascript'/>
    //PART 2
    <script type='text/javascript'>
    //<![CDATA[
    jQuery('a').each(function() {
    // Let's make external links open in a new window.
    var href = jQuery(this).attr('href');
    if (typeof href != 'undefined' && href != "" && (href.indexOf('http://') != -1 ||
    href.indexOf('https://') != -1) && href.indexOf(window.location.hostname) == -1) {
    jQuery(this).attr("rel", "nofollow");
    }
    });
    //]]>
    </script>
  • Save Your Template, u done it...
Always Comment and Subscribe and share with others  

How to Automatic SEO for Images - Add Proper ALT and Title Tags Automatically

I am sure that all blog owners wants to receive new traffic to their blogs. in support of this, SEO is very valuable and central. Earlier we discussed some methods of search engine optimization such as automatic image seo, outer (external ) link seo and making links nofollow. Right now, its clock to modify your shape pro better SEO. It has been proved to adding proper Meta Tags help a group trendy better search engine optimization so at this juncture we are ready to add mainly fashionable (popular) meta tag "description" trendy blogger / blogspot. Mainly of the Bloggers are already using this meta tag trendy their templates, if you are not individual of them, follow these tips.

How to Automatically Search Engine Optimization for Images

  •  Log Blogger Go to Dashboard > Design > Edit HTML (else move to next step)
  • Now, search for </body> code in your template (tip: press CTRL + F and paste this code)
  • Paste below given code in red colour just Before </body>


<script src='http://ajax.googleapis.com/ajax/libs/jquery/1.3.2/jquery.min.js' type='text/javascript'/>
<script type='text/javascript'>
//<![CDATA[
$(document).ready(function() {
$('img').each(function(){
var $img = $(this);
var filename = $img.attr('src')
$img.attr('alt', filename.substring((filename.lastIndexOf('/'))+1, filename.lastIndexOf('.')));
});
});
//]]>
</script>
<script type='text/javascript'>
//<![CDATA[
$(document).ready(function() {
$('img').each(function(){
var $img = $(this);
var filename = $img.attr('src')
$img.attr('title', filename.substring((filename.lastIndexOf('/'))+1, filename.lastIndexOf('.')));
});
});
//]]>
</script>


  • Save Your Template
  • Thats it...
 Always Comment and Subscribe and share with others